Compact Burrow
Compact Aboveground Burrow for One Tortoise, any size
(Footprint is about 7′ x 8′ – Costs $155 – $190)

Materials
Cement Blocks:
- 30 or 32 tongue and groove, 8″ x 6″ x 16″ (Note: actual block size is 155/8″ x 75/8″ x 55/8″)
Plywood:
- Approach A: If you will buy all the wood for this project
- Two sheets of 4′ x 8′ x 23/32″ CDX plywood
- Sheet 1: For the burrow floor, cut a piece 4′ x 5′. Cut 3 strips 4′ x 6″ to be cut to the right lengths for the channel lining.
- Sheet 2: Cut a piece 4′ x 5′ for the top of the burrow. Later, cut out the section at the front not supported by the blocks.
- Approach B: If you have large scraps of wood
- One sheet 4′ x 8′ x 23/32″ CDX plywood, cut into two pieces, 4′ x 4′ each;
- And 1 piece, 1′ x 4′; And 1 porch top, about 19″ x 11″; And lining for channel
Plastic sheets:
- 1 continuous sheet, 4 mil thick x 41/2′ x 51/2′. Do not use plastic anywhere except between the dirt and the plywood (Available at Lowe’s).
Soil:
- At least 31/2 tons of soil with the highest water-holding capacity possible; that is, not sandy, not gravelly soil that water will run right through. Soil should be unwashed so the finest particles remain. No rocks larger than 1/2″ diameter.
- Vista Landscape’s “Vista Gold Chat” works very well ((702) 565-6611)
Odds & Ends:
- Tapcon (or KwikTap) bit and screws to screw plywood to blocks (Do not use glue).
- Several bricks or stones to hold back the dirt on top of the porch.
- Decorative slabs of stone for looks and to hold back the dirt from the doorway.
Customize the channel
Styrofoam:
- Add height to the channel if the tortoise stands more than about 61/2 inches tall.
- 1 piece 4′ x 5′ of either 1″ or 2″, depending on height of the tortoise.
2″ x 8″ x 8′:
- One 8′ board cut into two 4′ lengths. Each board will decrease the width of the channel by 11/2″; 6 or 8 finishing nails.
Burrow Theory
This burrow will provide adequate protection for the tortoise in summer and winter. The tortoise will be approximately in the center of the mound where the protection is greatest. The tortoise has the width of a block for privacy and coziness, and to get out of any air flow. However, the custodian can always see the tortoise! No worry! The burrow will never collapse or flood if located properly. It’s built to expand as the tortoise grows and to last a lifetime.>
Burrow Design
- Build in a dry place as shaded as possible, not on pavement or within 5 feet of a wall.
- Make sure water from the yard, roof, sprinklers, and sidewalks will not drain into burrow.
- The burrow opening should face south, southwest, or southeast (unless shaded). It is important that the hot summer sun from the north not shine into the burrow opening.
- The inside channel should be as snug as possible, but wide enough and tall enough for your tortoise. We can build it to expand as your tortoise grows.
- You may want to figure out your block plan ahead of time to be sure everything fits. Graph paper helps. Refer to Figure 3 for a suggested design.
- You will want to create a “porch” structure at the entrance. Blocks or bricks on top of the porch keep the soil in place. Figures 11 and 12 show possible solutions to hold back soil.
Laying the Groundwork
- Level the site using 1-2 inches of the new soil so water will run around and under the plywood and the blocks will seat nicely on a flat surface, Figure 1.
- Smooth the plastic sheet on the soil, Figure 2. Place the 4 x 5 foot piece of plywood on top of the plastic so a few inches of the plastic sheet extend beyond each edge, Figure 3. The plastic is to keep the wood dry from moisture in the soil.
Building Level One
Orient the blocks with the holes facing up. Some blocks may have holes on the sides for conduit, etc. Place those blocks with the holes up so that the tortoise can’t stick a foot or nail in anywhere and the soil will not run out. First make a row of blocks around the edge of the plywood, leaving an open space for the door. Be sure to snug up the tongues and grooves. Place a second row (and possibly a third) of blocks inside the first to create the channel, staggering the joints if possible for better insulation. See Figure 3.
Lining the Channel
Line the channel with plywood so that the tortoise will not scrape its shell on the coarse cement blocks. Cut pieces of plywood to completely line the channel. Place strips of plywood flush with the bottom of the channel. Screw plywood to the blocks using a TapCon or KwikTap bit and screws. Make sure the corners of the plywood are snug and that the tortoise won’t stick a claw into a small crack when it’s digging, Figure 4. Do not use glue (tortoises are very sensitive to fumes) Fit the Channel to Your Tortoise The channel in Figure 3 is large enough for one large adult tortoise.

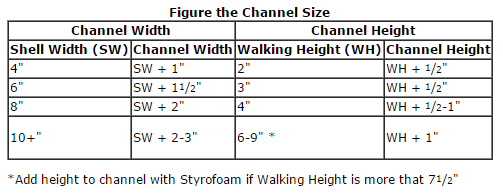
Making the Channel the Right Width for Your Tortoise (Refer to Chart above)
Measure the width of your tortoise’s shell. A burrow should be snug with very little air circulation. This strategy helps keep the tortoise cool in the summer and warm in the winter. The tortoise should not be able to turn around in the channel. Example: your tortoise might be 4′ wide x 7″ long or 8″ wide x 10″ long. The width of the channel should be the width of your tortoise plus about 11/2″- 2″. That extra 11/2″-2″ allows for growth, legs, and walking room (Leave more extra space for large tortoises than small ones.). Unless your tortoise’s shell is 12″ wide, plan to decrease the width of the channel with boards that can be removed as the tortoise grows. Each board decreases the width by 11/2″ Example: tortoise shell is 61/2″ wide + 11/2″ for feet sticking out when walking=8″. Channel is 14″ minus plywood lining of 11/2″ = 121/2″. Hmm. How many boards should I use to decrease the width to 8″? 3 boards @ 11/2″ each = 41/2″ (121/2″ ” – 41/2″ = 8″!) Figure 6. Use one 2″ x 8″ x 4′ board for every 11/2″ of width. For instance, to decrease the width by 3″, use two boards.
- Insert a board parallel to the 4′ edge of the channel.
- Use a finishing nail to hold the board in place at the turnaround end of the channel. (See Figure 5) Hammer into the back board, flush with the 2″ x 8″, head of nail as close to roof as possible. This nail will stay in place later when the board is removed, so be sure it’s out of the way.
- Repeat for each board or 11/2″ you want to decrease thewidth of the burrow.
- After you place the plywood for Level Two over the blocks, use a finishing nail to keep each board in place. (Figure 7) You will remove these nails when you need to remove boards.
- As your tortoise grows, remove a nail and slide out one board to increase the channel width by 11/2″. This should give your tortoise plenty of room to grow forever.
Adding Some Height to the Channel Using Styrofoam (Refer to Chart above)
Measure the Walking Height (WH) of your tortoise. If your tortoise is more that 61/2″, add an inch or two to the height of the channel using a Styrofoam sheet (see below). If your tortoise is a little one, plan ahead and add some height now. It can’t hurt. Example: The size of the channel is 9″ (71/2″ cement block + 11/2″ foam. 9″ is obtained by Tortoise Height (4″) + 1″ clearance above tortoise + Enough Soil (4″) to make 9″. Place the 4′ x 5′ piece of foam on top of the blocks so that it’s oriented like the plywood. With a sharp implement, cut out the channel leaving foam covering the all the blocks and any added planks. See Figure 7. Cover the porch and the planks even though the picture doesn’t show it. Set aside.
Adding Soil to Level One
- Fill the blocks with soil for good insulation, Figure 8.
- Very important step: Put several inches of nice, rock-free soil in the channel. Measure that your tortoise will have about a 1/2″ – 1″ clearance when walking. If you are building for a small tortoise, you use a lot of soil. You want the channel to be snug. Measure the height of your tortoise and add or subtract soil on the floor of the channel to create the right snugness. Figure 8.
- Replace the foam (if used) on top of the blocks.
If you are adopting a tortoise from Tortoise Group, leave the burrow at this stage for inspection by an Adoption Committee Representative.
Building Level Two
- Lay a second sheet of plywood over the blocks (or blocks and foam).
- If you inserted 2′ x 8″ boards, use a finishing nail to keep each board in place(Figure 9). You will remove these nails when you need to remove boards.
- Place a row of blocks around the edge of the plywood, placing corner blocks at an angle. See Figure 10. The purpose of these blocks is to keep the soil in place.
- Place bricks or decorative blocks at the edge of the porch to hold the soil in.
- Place decorative rocks or boulders in front of cement blocks, if desired.
Now continue building Level 2
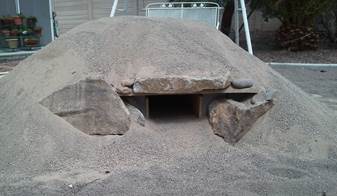
- Fill the blocks with soil and mound the soil on the roof as high as possible. Pack it down as you proceed without standing on it. See Figure 11.
- Allow the soil to flow down the sides. Mound the rest of the soil on the sides and top. The more the better.
- More soil should be piled and packed on the west and northwest-facing sides and roof area.
- Round and smooth the top surface leaving no depressions where rain will puddle, Figure 12.
- Mist the soil until damp to create a hard shell.
When It Rains
Heavy rain. Help the burrow soil deal with rain. If you are home, quickly cover the roof with a tarp when it starts to rain and remove it as soon as the rain stops to reduce the greenhouse effect. Having ready lumber and a few large rocks to hold down the tarp in the wind. You will know this if you have experienced our dramatic rain storms.
