An unmarked tortoise has almost no chance of being returned to you if it escapes.
Never drill holes through the shell. There are nerves and blood vessels under the entire shell. Drilling causes pain. Never cover the shell with paint or similar material. If you receive a tortoise that has been painted, do not try to remove the paint. Solvents that remove paint should not come in contact with the seams between the shell plates (scutes) where there is sensitive, live tissue. Scraping the paint can cause injury. The paint will eventually wear off.
Materials needed: Quick-drying (5-minute) clear epoxy. A piece of white, self-stick label cut to size, that is, no larger than needed to hold your phone number. Use a fine tipped pen with dark waterproof/India ink (other inks may fade) or type or print out the number, firm toothpicks, old, clean plastic lid, small rags damp and dry.
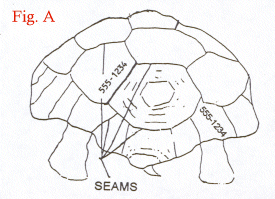 Clean and dry an area on a scute where it has or will receive very little abrasion. See suggested places under Figure A. The cleaned area should be large enough for the sticker that will hold your phone number (you may have to use two lines) and allow a margin of shell for the epoxy to overlap the sticker and yet NOT TOUCH A SEAM. See Figure B. IF EPOXY GETS IN THE SEAMS IT CAN CAUSE DEFORMITY AS THE TORTOISE GROWS. For hatchlings, use a waterproof marker and write a letter or some dots on a scute. Redo as necessary until the tortoise is large enough for an epoxy covered tag.
- Set up a protected area on a table with all the materials. Apply the sticker with your number to the cleaned area, pressing it firmly against the shell using a tissue, not your bare finger. Only now should you mix the epoxy. Make sure the tortoise is within reach but not on the table while you are mixing the epoxy. In a box, if necessary.
 Unless your are experienced with epoxy, practice several times on a piece of cardboard.on which you have written your number. Mix the epoxy thoroughly according to directions on an old plastic lid with a toothpick and apply to a practice label before it becomes too firm to spread but not while it is still runny enough to flow onto the seams. Timing is everything. Even when at the right consistency, the epoxy will tend to sag downward so start applying at the top of the tag by touching drops of epoxy from the toothpick on the upper edge of the tag and dragging it short distances to cover. Cover the tag a little beyond the edges to seal it. (Figure B.) Have your small damp rag ready so you can immediately and firmly wipe off any epoxy that sags or runs, especially into the seams. The rag should be thin enough for your fingernail to make the precise cleaning action. Practice will help with this, also.
- To hold the tortoise relatively still while you are applying the epoxy use your other hand and gently but firmly hold it over the opening of the shell to keep the tortoise’s head inside. You may have to press the tortoise against your body as well, unless you have help.
Keep the tortoise away from blowing dust, grass, or the burrow until the epoxy has become dry. (About 20-30 minutes should be enough time.) Leave the tooth pick in the plastic lid where you mixed the epoxy. You can test the set of the epoxy there without touching the tortoise’s tag. If you did not mix equal amounts of the epoxy and the hardener, the epoxy will never set and you will have to start over. It will pay to practice.