Hatching
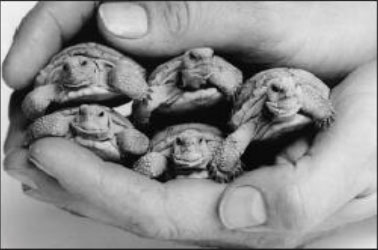
Hatching occurs between late August and early October. After cracking the egg, the 2″ hatchling usually remains underground for a few days. During this time the yolk sac that protrudes from the lower shell shrinks and dries within the safety of the nest. By the time you see the hatchling walking about, there should be only a slightly raised “belly button” where the yolk sac was.
The almost boneless shell is very soft, yet the hatchling is ready to live outdoors on its own without parental care. The desert tortoise is adapted to the desert climate. Your hatchling, too, should live outside to develop properly. If you create a good outdoor habitat for your hatchlings, they should thrive.
Setting Aside Part of the Yard for Hatchlings
Hatchlings need a lot of area, more than you might think for their size. Give them a separate area at least 100 square feet for one to four hatchlings. It is important to make the enclosure longer than it is wide (at least 5′ x 20′). This allows enough separation between the burrow end that should stay dry and the damp area at the other end for water and growing food.
Build the enclosure where it will receive direct sunlight most of the day, especially in the spring and fall. Areas on the sides of most houses are usually too narrow to provide enough direct sunlight. Do not use the side of a building or the property boundary walls as sides of the baby pen. Those walls will radiate a great deal of heat.

Hazards for Hatchlings
If you plan to keep any hatchlings, prepare your yard for them before August.
The babies will need adequate shelter from the heat as soon as they hatch. Hatch-lings will use the entire yard, so reconsider possible hazards in terms of the small size of hatchlings.
Escape. Tortoises will stand on their hind legs to get through cracks.
Vertical Drops- Drops greater than the tortoise is long, like tree wells and grass edges, may cause the tortoise to tip over.
Grass- Hatchlings have a hard time walking on grass and may become exhausted and stranded on the lawn. Death from overheating may soon follow. To give small tortoises easy access to growing food, water, and their burrows, make sure there is a con-tinuous path of bare soil connecting these basic needs.
Building a Hatchling Enclosure
Hatchlings must not be able to see through the side of an enclosure, so we suggest walls of cinder block. The walls need be only two cinder blocks high, plus an important single top row of “half blocks,” 16” x 7 1/2″ x 3 1/2″ – wider than the top of the cinder blocks.

Place the half-blocks so they hang over the inner edges of the cinder block. This will prevent escape, and hatchlings will try. They have long nails and will climb up the corners and escape or fall into the holes in the cinder blocks and die if they are not covered. Covering the cinder blocks also makes the enclosure more attractive and good for sitting.

1. Stack two courses of cinder blocks without mortar to create an enclosure at least 5′ x 20′, or 100 square feet.
2. Create the overhang using a single row of solid half blocks placed so they hang over the inner edge of the cinder blocks.
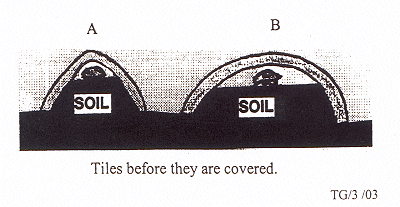
3. Build a burrow for each hatchling using rounded rake roof tiles, different from regular roof tiles.

Rounded rake tile, A, provides snug fit for good insulation. Compare to B, which allows easy entry of hot air and breezes that dehydrate.
a. Use two or three ceramic roof tiles set end-to-end in a downward-sloping trench filled with rock-free soil. Cover each seam between the tiles with a strip of plastic.
b. Use a broom handle to create a channel that is a just large enough for the tortoise to move the entire length of the burrow. With the broom handle, pack down the soil just enough to create a firm surface for the juvenile to walk easily and not sink into the soil.

c. Cover the tiles with at least 18–24″ of soil with high water-holding capacity, not sand or gravel. Pack down the soil firmly. Use reject sand or chat. d. Beyond the end of the burrow, create a pile of rock-free, well-packed soil that you know will hold its shape when the juvenile attempts to extend the burrow and/or create a turnaround. You can test this with your hand. This pile should extend at least two feet beyond the burrow, be two feet wide, and as high as the soil covering the tiles.
4. On the end of the pen to be irrigated, use soil with added organic matter for growing food plants. Transplant dandelions and low perennial ornamentals. See our plant list for ideas.

Dry end with burrows, wet end with plants
5. Install a terracotta water dish at the wet end big enough for the hatchlings to soak in. You may need to raise the level of the bottom with small pebbles so the hatchlings can climb out easily.
Hatchling Hibernation
In the desert, even hatchlings hibernate outdoors the first winter. Indoors there is a risk of dehydration and death. However, sometimes it is necessary to provide a cold place for hibernation if the hatchling enclosure and burrows are not ready.
