Large Aboveground Burrow

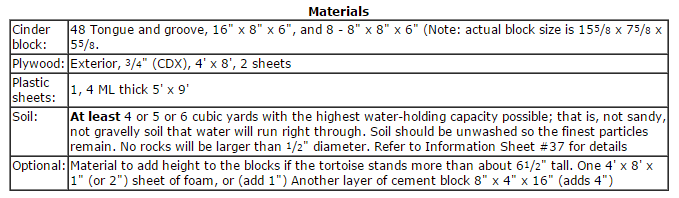
Materials
Burrow Design
- Build in a dry place as shaded as possible, not on pavement or within 5′ of a wall.
- The door opening is the width of one big tortoise, or 1 block long. The door should face east or southeast, never west or northwest. It is extremely important to keep the hot summer sun from shining directly into the burrow.
- The inside channel should be plenty wide for your tortoise, allowing for growth. If you have two tortoises, make the turnaround large enough so that each tortoise can fit in a corner, move around, and go out the channel.
- The corner in the channel is important to slow air exchange with the outside.
- You may want to figure out your block plan ahead of time to be sure everything fits. Graph paper helps. Refer to Figure 3 for a suggested design.
- You might want to create a little “porch” structure in front of the door. An upside down U structure keeps the soil in place and shades the door. Figure 8 shows a nice roof tile structure.
- Is an aboveground burrow appropriate for a juvenile? A juvenile will outgrow a channel of its size in no time, necessitating a redo of the burrow. Making an adult-sized channel for all sizes of small tortoises is a compromise that the smaller tortoises may accept or not. And the burrow will not be snug.
- Access to a tortoise during a possible emergency requires some forethought to eliminate removing the roof. Here’s one idea: In the turnaround area on the side least impacted by the hot sun, create an area where you can remove a block(s) from the outside. We glued a handle onto a block. Obviously this will not work if the tongue and grooves are tight. Be creative. Maybe use some foam board or wood. Our tortoise was old and arthritic; otherwise, it would not have been necessary.
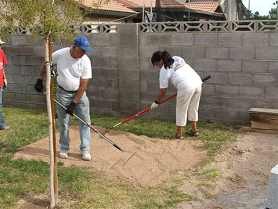
Laying the Groundwork
- Level the site using 1″-2″ of the new soil so water will run around and under the plywood and the blocks will seat nicely on a flat surface Figure 1.
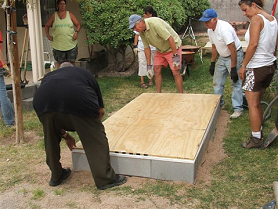
- Smooth the plastic sheet out on the soil. Place 1 piece of plywood on top of the plastic so that about 6″ of the plastic sheet extend beyond each edge. See Figure 2.
Building Level One
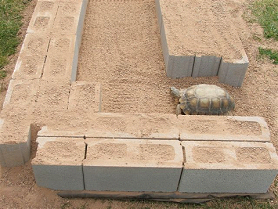
- Orient the blocks with the holes facing up. Some blocks may have holes on the sides for conduit, etc. Place those blocks with the holes up so that the tortoise can’t stick a foot or nail in anywhere. First make a row of blocks around the edge of the plywood, leaving out one block for the door on the east, south, or southeast side. Be sure to snug up the tongues and grooves. Place a second row (and possibly a third) of blocks inside the first to create the channel, staggering the joints if possible for better insulation. See Figure 3.
Adding Soil to Level One
- Fill the blocks with soil for good insulation.
- Put one inch or so of nice, rock-free soil in the channel. Measure that your tortoise will have about a 1/2″ – 1″ clearance when walking. You want the channel to be snug. Measure the height of your tortoise(s) and add or subtract soil on the floor of the channel to create the right snugness. Figure 3.
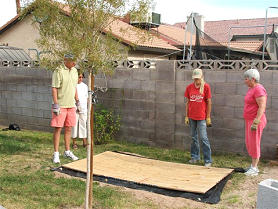
Adding Some Height Using Foam
- If your tortoise is taller than the cement blocks plus soil when walking, you can increase the height of the blocks by adding a 1″-thick 4′ x 8′ sheet of foam. Place the foam on top of the blocks so that it’s oriented just like the plywood. With a sharp knife, cut out the channel leaving foam covering the blocks. See Figure 4.
If you are adopting a tortoise from Tortoise Group, leave the burrow at this stage for inspection by an Adoption Committee Representative.
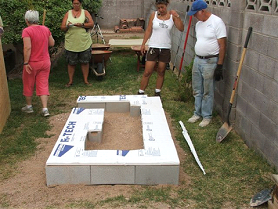
Building Level Two
- Lay a second sheet of plywood over the blocks (or foam). See Figure 5.
- Place a row of blocks around the edge as before, making snug joints. See Figure 6.
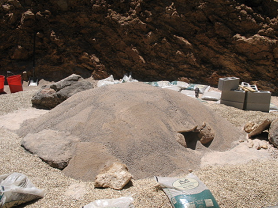
- Fill the blocks with soil and mound the soil on the roof to at least 12″. Pack it down as you proceed without standing on it. See Figure 7.
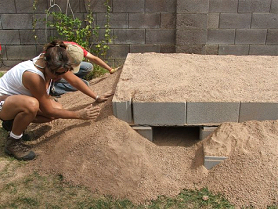
- You should still have lots of soil left. Now mound the rest of the soil on the sides and top. The more the better.
- More soil should be piled and packed on the west and northwest-facing sides and roof area.
- Round and smooth the top surface to leave no depressions where rain will puddle. See Figure 8.
When It Rains
- Heavy rain. Help the burrow soil deal with rain. If you are home, quickly cover the roof with a tarp when it starts to rain and remove it as soon as the rain stops to reduce the greenhouse effect. Having ready lumber and a few large rocks to hold down the tarp is important. You will know this if you have experienced our dramatic rain storms.